
A hinge cutting tool helps you create clean, precise cuts in wood for fitting hinges. Using this tool correctly ensures optimal results and enhances the longevity of your project. Proper technique prevents damage to both the tool and the material. Safety precautions, such as wearing personal protective equipment (PPE) and maintaining a safe workspace, are essential when using a hinge cutting tool.
Understanding the Hinge Cutting Tool
What is a Hinge Cutting Tool?
Definition and Purpose
A hinge cutting tool helps create clean, precise holes in wood for fitting hinges. This tool attaches to a power drill and resembles a Forstner bit. The design allows for flat-bottomed holes, making it ideal for woodworking, carpentry, and joinery.
Types of Hinge Cutting Tools
Several types of hinge cutting tools exist. Standard hinge cutters work well for most projects. Specialized versions, such as adjustable hinge cutters, allow for different hole sizes. Some models include built-in depth stops for consistent results.
Key Features to Look For
Blade Quality
High-quality blades ensure clean cuts. Look for carbide-tipped or high-speed steel blades. These materials offer durability and precision. Sharp blades reduce splintering and improve overall performance.
Handle Design
Ergonomic handle designs enhance comfort. A good grip reduces hand fatigue during extended use. Some handles feature rubberized grips for added control. Comfortable handles improve accuracy and safety.
Safety Features
Safety features protect users from accidents. Look for tools with built-in guards. Guards prevent accidental contact with the blade. Some models include automatic shut-off mechanisms. These features enhance user safety and tool longevity.
Preparing for Hinge Cutting

Safety Precautions
Personal Protective Equipment (PPE)
Wearing proper personal protective equipment (PPE) ensures safety during hinge cutting. Essential PPE includes:
- Safety glasses: Protect eyes from wood chips and debris.
- Hearing protection: Shields ears from loud tool noises.
- Gloves: Guards hands against cuts and splinters.
- Dust mask: Prevents inhalation of wood dust.
Always inspect PPE for damage before use. Replace any worn or damaged items immediately.
Safe Workspace Setup
A safe workspace minimizes the risk of accidents. Follow these guidelines to create a secure environment:
- Clear the area: Remove any obstacles or clutter.
- Good lighting: Ensure adequate illumination for visibility.
- Stable work surface: Use a sturdy table or workbench.
- Proper ventilation: Maintain airflow to disperse dust and fumes.
Keep a first aid kit nearby for emergencies. Familiarize yourself with its contents and usage.
Necessary Tools and Materials
List of Required Tools
Using the right tools guarantees precise and efficient hinge cutting. Gather the following items:
- Hinge cutting tool: Choose a high-quality model with sharp blades.
- Power drill: Provides the necessary power for the hinge cutting tool.
- Measuring tape: Ensures accurate measurements.
- Pencil: Marks hinge locations on the wood.
- Chisel and mallet: Fine-tunes the hinge cut if needed.
- Clamps: Secures the wood in place during cutting.
Check each tool for proper function before starting the project.
Recommended Materials
Selecting suitable materials enhances the quality of your hinge cuts. Consider the following recommendations:
- Wood type: Softwoods like pine are easier to cut. Hardwoods like oak require more precision.
- Hinges: Choose hinges that match the project’s specifications.
- Sandpaper: Smooths the cut edges for a clean finish.
- Wood filler: Fills any gaps or imperfections in the cut.
Store materials in a dry, cool place to prevent warping or damage.
Step-by-Step Guide to Using a Hinge Cutting Tool

Marking the Hinge Location
Measuring and Marking Techniques
Accurate measurements ensure proper hinge placement. Use a measuring tape to determine the exact location for the hinge. Mark the spot with a pencil. Double-check the measurements to avoid errors.
Place the hinge on the marked spot. Trace around the hinge with the pencil. This outline will guide the cutting process. Ensure the lines are clear and visible.
Common Mistakes to Avoid
Avoid rushing through the marking process. Inaccurate marks lead to misaligned hinges. Ensure the measuring tape remains straight when taking measurements. Crooked measurements cause errors.
Do not use a dull pencil. Faint lines are hard to see and follow. Always use a sharp pencil for clear marks. Refrain from eyeballing measurements. Precision is key for optimal results.
Making the Cut
Proper Cutting Technique
Secure the wood piece with clamps. This prevents movement during cutting. Attach the hinge cutting tool to the power drill. Align the tool with the marked outline. Start the drill at a low speed.
Apply steady pressure while cutting. Do not force the tool. Let the blade do the work. Increase the drill speed gradually. Maintain control for a clean cut. Stop periodically to check progress.
Adjusting for Different Wood Types
Softwoods like pine require less pressure. Use a moderate drill speed. Hardwoods like oak need more precision. Apply firm pressure and use a higher drill speed. Adjust the technique based on the wood type.
Inspect the cut frequently. Make adjustments as needed. Ensure the cut depth matches the hinge thickness. Consistent checking prevents overcutting.
Finishing Touches
Smoothing the Cut
Use sandpaper to smooth the cut edges. Start with coarse-grit sandpaper. Remove any rough spots or splinters. Switch to fine-grit sandpaper for a smooth finish. Wipe away dust with a clean cloth.
Check the cut for any imperfections. Fill gaps with wood filler if necessary. Allow the filler to dry completely. Sand the area again for a seamless finish.
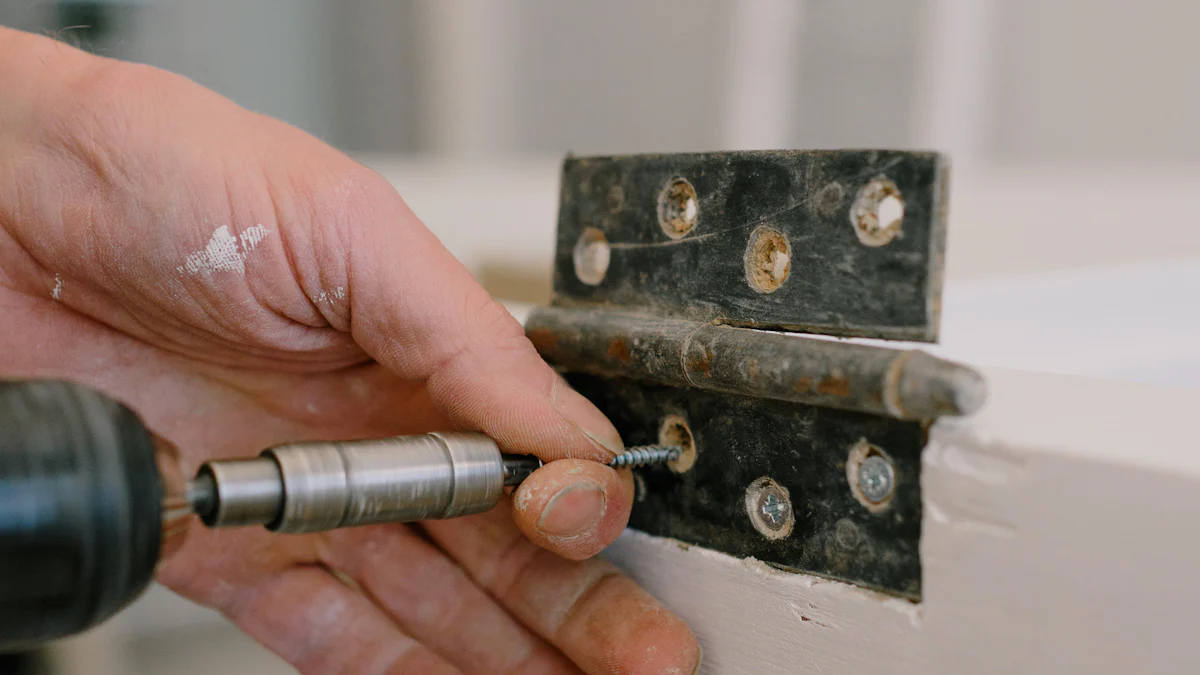
Installing the Hinge
Place the hinge in the cutout. Ensure it fits snugly. Align the hinge holes with the wood. Use a screwdriver to secure the screws. Tighten each screw firmly. Check the hinge movement. Ensure it operates smoothly.
Test the hinge by opening and closing it several times. Make any final adjustments if needed. A well-installed hinge enhances the project’s functionality and appearance.
Advanced Techniques and Tips
Working with Different Wood Types
Softwood vs. Hardwood
Softwoods like pine and cedar cut easily. These woods require less force and lower drill speeds. Softwoods often produce cleaner cuts with minimal effort. Hardwoods like oak and maple need more precision. These woods demand higher drill speeds and firmer pressure. Hardwoods can splinter if not handled correctly.
Adjusting Cutting Techniques
Adjust cutting techniques based on wood type. For softwoods, use moderate pressure and steady speed. Softwoods respond well to gentle handling. For hardwoods, apply firm pressure and increase drill speed. Frequent checks ensure accuracy. Inspect the cut frequently to avoid overcutting. Adapt the technique to the specific wood for optimal results.
Troubleshooting Common Issues
Uneven Cuts
Uneven cuts often result from improper technique. Ensure the tool remains aligned with the marked outline. Secure the wood firmly with clamps to prevent movement. Apply consistent pressure throughout the cut. Check progress frequently to maintain evenness. Sand any uneven areas to smooth the surface.
Tool Maintenance
Proper maintenance extends tool life and ensures performance. Clean the tool after each use to remove debris. Sharpen blades regularly to maintain cutting efficiency. Inspect the tool for any signs of wear or damage. Replace worn parts immediately to prevent accidents. Store the tool in a dry, cool place to avoid rust and damage. Regular maintenance keeps the tool in optimal condition.
Review the key points covered in this guide. Understand the importance of using high-quality tools and following proper techniques. Practice regularly to refine your skills. Consistent practice leads to better results.
Always prioritize safety. Wear appropriate personal protective equipment (PPE) and maintain a safe workspace. Remember, safety first.
Feel free to share feedback or ask questions. Your input helps improve future guides. Happy hinge cutting!