
When it comes to cutting door hinges by hand, precision is key. Utilizing a tool to cut hinges in a door manually provides you with control and finesse. Mastering this skill enhances your DIY confidence, allowing you to tackle projects effortlessly. Manual techniques not only offer satisfaction and accuracy but also help you appreciate the craftsmanship involved. This skill can save you both time and money, ensuring your doors function smoothly. Embrace the challenge and enjoy the process.
Tools and Materials Needed
Essential Tools
Measuring Tape
A measuring tape helps you determine the precise location for your hinges. Accurate measurements ensure a perfect fit. Place the tape on the door and frame to mark where each hinge will go.
Chisel
A chisel is essential for cutting mortises. This tool allows you to carve out the wood to the exact depth of the hinge leaf. Use a piece of tape on the chisel as a guide for depth. This method has stood the test of time.
Hammer
A hammer works hand in hand with the chisel. Light taps help you remove wood without damaging the door. Control and precision come from gentle, steady strikes.
Utility Knife
A utility knife scores the outline of the hinge mortise. Sharp lines guide the chisel work. Clean cuts make the process smoother and more efficient.
Additional Materials
Pencil
A pencil marks the hinge placement. Clear markings prevent mistakes. Use a pencil to draw lines that guide your cutting.
Safety Gear
Safety gear protects you during the process. Wear goggles to shield your eyes from flying debris. Gloves can protect your hands from accidental cuts.
Door Hinges
Door hinges are the stars of the show. Choose hinges that match the style and function of your door. Most interior doors need two hinges, while heavier doors might require three or more.
Preparing the Door and Frame
Marking the Hinge Placement
Measuring the Door
Grab a measuring tape. Measure the door’s height from top to bottom. Divide the door into equal sections. Decide where the hinges will go. Most doors need hinges at the top and bottom. Heavier doors might need more hinges. Keep measurements consistent for a balanced look.
Marking with Precision
Use a pencil for marking. Draw lines where each hinge will sit. Make sure the lines are straight. Double-check your work. Accurate marks lead to a perfect fit. A ruler can help keep lines straight.
Preparing the Work Area
Securing the Door
Find a stable surface. Place the door on a pair of sawhorses. Use clamps to hold the door steady. Movement can cause mistakes. A secure door makes work easier and safer.
Ensuring Safety
Wear safety goggles. Protect your eyes from wood chips. Gloves can shield your hands from sharp tools. Keep the work area clean. Clear away any clutter. A tidy space reduces accidents. Safety should always come first.
Cutting the Hinge Mortise
Cutting a hinge mortise by hand requires precision and patience. You can achieve a professional finish with the right approach. Let’s dive into the steps to create a perfect mortise using a tool to cut hinges in a door.
Scoring the Outline
Using the Utility Knife
Start by scoring the outline of the hinge mortise with a utility knife. Hold the hinge against the door where you marked the placement. Use the knife to trace around the hinge. This initial cut will guide your chisel work. Ensure the blade is sharp for clean lines. A dull blade can cause jagged edges, making the process harder.
Ensuring Clean Lines
Clean lines are crucial for a neat finish. Press the utility knife firmly but gently along the marked outline. Repeat the scoring process a few times to deepen the cut. This step helps prevent the wood from splintering when you start chiseling. Consistent pressure ensures a uniform depth around the hinge outline.
Chiseling the Mortise
Starting with the Corners
Begin chiseling at the corners of the mortise. Use a chisel to make small cuts, working from the scored lines inward. The corners set the boundaries for the rest of the mortise. Keep the chisel angled slightly towards the center to avoid cutting beyond the outline. Light taps with a hammer help control the depth.
Removing Excess Wood
Once the corners are defined, remove the excess wood inside the outline. Work in small sections, gradually deepening the mortise. A tool to cut hinges in a door like a chisel requires patience. Take your time to ensure even depth across the entire mortise. Regularly check the depth with the hinge to avoid overcutting.
Finishing Touches
Smoothing the Edges
Smooth the edges of the mortise with the chisel. This step ensures the hinge sits flush with the door surface. Carefully shave off any rough spots or uneven areas. A smooth mortise enhances the hinge’s performance and appearance. Precision in this step reflects the craftsmanship of traditional methods.
Checking the Fit
Finally, check the fit of the hinge in the mortise. Place the hinge into the cutout and ensure it sits level with the door surface. Adjust the mortise if necessary. A snug fit prevents the hinge from shifting over time. Mastering this skill with a tool to cut hinges in a door boosts your DIY confidence.
Installing the Hinges
Aligning the Hinges
Positioning on the Door
Place the hinge on the door where you cut the mortise. Ensure the hinge leaf sits flush with the door surface. A snug fit prevents wobbling and ensures smooth operation. Use a pencil to mark the screw holes on the door. These marks guide the next steps in securing the hinges.
Ensuring Proper Alignment
Align the hinges on the door and frame. Make sure the hinge knuckles face outward for proper movement. Check that the hinges line up perfectly with each other. Misalignment can cause the door to bind or not close properly. Double-check the alignment before proceeding to secure the hinges.
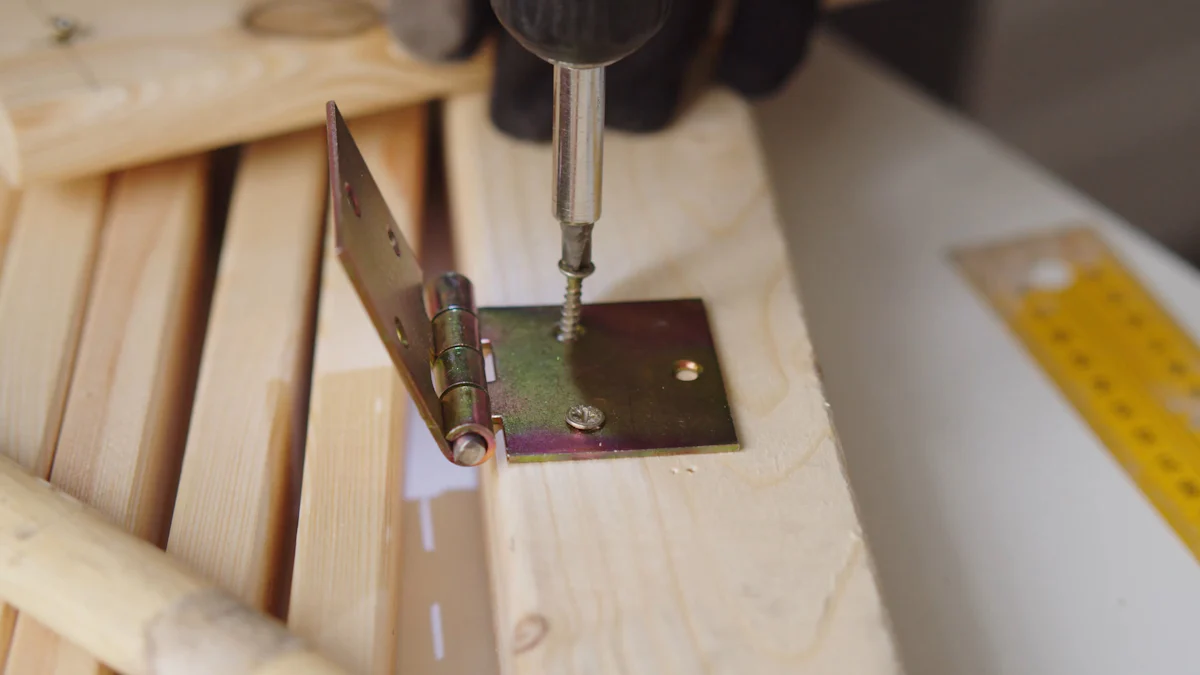
Securing the Hinges
Using Screws
Pre-drill the marked screw holes using a drill bit slightly smaller than the screws. Pre-drilling prevents the wood from splitting when inserting screws. Secure the hinge to the door with screws, starting with the center hole. This method allows for adjustments if needed. Tighten the screws firmly but avoid over-tightening to prevent stripping.
Final Adjustments
Test the door by opening and closing it a few times. Check for smooth movement and ensure the door hangs evenly. Adjust the screws if the door feels stiff or uneven. A well-installed hinge should allow the door to swing effortlessly. Mastering this process boosts your confidence in using a tool to cut hinges in a door.
Erin Spain shared her experience:
“This template made the job so ridiculously easy. After you’ve routed for your hinges, you just position the hinge in place and then can pre-drill holes for your screws.”
You now have the skills to cut door hinges by hand with precision. Regular maintenance keeps hinges in top condition. Lubricate hinges to prevent squeaks. Tighten loose screws to maintain alignment. Choose heavy-duty hinges for smoother operation on heavy doors. Practice these techniques to refine your skills. Each project builds confidence and expertise. Embrace the challenge and enjoy the satisfaction of a job well done.