
Custom tool inserts transform chaotic toolboxes into organized havens. Foam inserts provide each tool with a designated spot, preventing collisions and ensuring easy access. This organization boosts efficiency and saves time. Foam’s flexibility allows for full customization, making it perfect for any toolbox. The process of cutting tool foam involves simple steps that anyone can follow. Dive into the world of foam inserts and experience a tidier, more efficient workspace.
Tools and Materials Needed

Creating perfect tool inserts begins with gathering the right tools and materials. This section will guide you through what you need to get started.
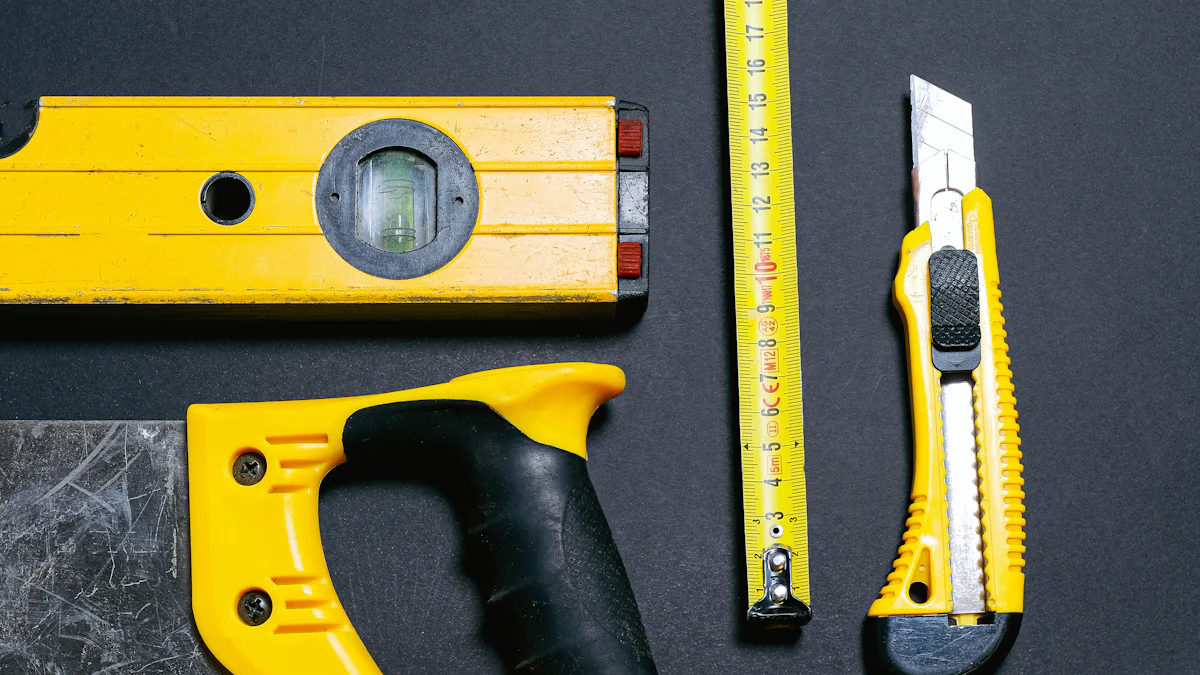
Essential Tools
Cutting Tools
A good cutting tool is crucial for achieving clean cuts in foam. Consider using a utility knife or an X-Acto knife. These tools are sharp and precise, making them ideal for cutting tool foam. For those looking for a smoother finish, a Shadow Foam scalpel offers excellent results. An electric filet knife also works well for larger projects, providing clean cuts with ease.
Measuring Tools
Accurate measurements ensure that each tool fits perfectly into its designated spot. Use a tape measure or a ruler to get precise dimensions of your tools and the foam. Accurate measurements prevent errors and ensure a snug fit.
Marking Tools
Marking tools help outline where to cut. A permanent marker or a pencil works well for this purpose. Make sure to mark clearly so you can follow the lines easily when cutting.
Types of Foam
Polyethylene Foam
Polyethylene foam is durable and resistant to chemicals. It provides excellent protection for tools and is easy to cut with a straight blade. This foam type is a popular choice for tool inserts due to its resilience.
Polyurethane Foam
Polyurethane foam is softer and more flexible. It absorbs impact well, making it suitable for delicate tools. This foam type is versatile and can be shaped easily.
EVA Foam
EVA foam combines durability with flexibility. It is lightweight and often used for custom projects. EVA foam is easy to work with and provides a professional finish.
Additional Materials
Adhesives
Adhesives secure the foam inserts in place. Consider using a spray adhesive or a double-sided tape. These options ensure that the foam stays put, even with frequent use.
Finishing Materials
Finishing materials give your project a polished look. Sanding blocks smooth out rough edges, while a heat gun can refine the foam’s surface. These materials help achieve a professional appearance.
With these tools and materials at your disposal, you’re ready to start cutting tool foam and creating custom inserts. Gather everything you need, and you’ll be on your way to a more organized toolbox.
Planning and Preparation
Measuring and Marking
Measuring Tools
Accurate measurements make a huge difference when cutting foam for tool inserts. A tape measure or ruler works best for this task. Measure each tool carefully. Precision ensures that every tool fits snugly in its spot. Avoid rushing through this step. Taking your time here saves you from headaches later.
Marking Techniques
Once you have your measurements, marking the foam becomes the next step. Use a permanent marker or pencil to outline where you’ll cut. Clear lines help you follow the path easily. Make sure the marks are visible. This clarity prevents mistakes during cutting.
Designing the Layout
Tool Arrangement
Arranging tools in the foam requires some thought. Place frequently used tools in easy-to-reach spots. This arrangement boosts efficiency. Group similar tools together. This grouping helps you find what you need quickly. A well-thought-out layout makes your toolbox a joy to use.
Space Optimization
Space optimization plays a key role in designing your layout. Maximize every inch of your foam insert. Avoid leaving large gaps between tools. Tight spacing keeps everything secure. Consider the depth of each tool as well. Deeper tools might need more foam layers. Efficient space use ensures a neat and organized toolbox.
Kaizen foam offers versatility for tool organization. This foam type adapts well to various layouts. Its flexibility allows for efficient storage solutions. Enjoy the benefits of a well-organized toolbox with these planning tips.
Cutting the Foam
Cutting tool foam requires precision and care. The right techniques ensure clean cuts and a perfect fit for your tools. Let’s dive into some effective methods.
Cutting Techniques
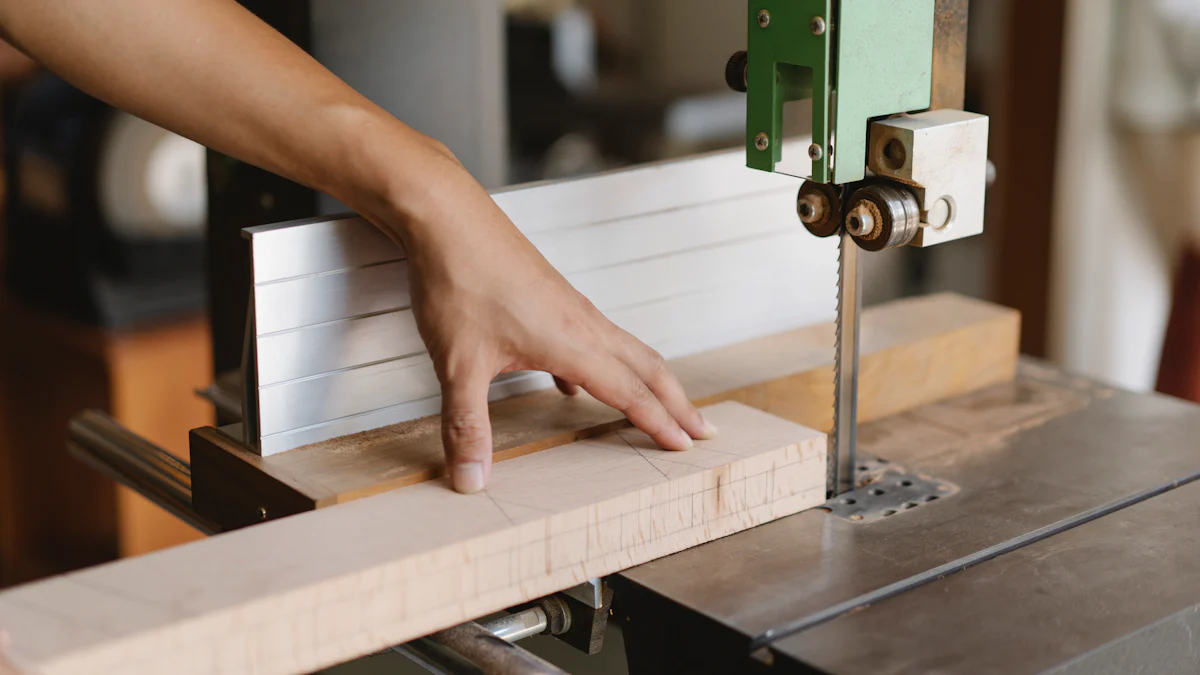
Using a Utility Knife
A utility knife serves as a versatile cutting tool for foam. Keep the blade sharp for the best results. A dull blade can tear the foam, leading to uneven edges. For thicker foam sheets, use a retractable blade. This allows you to control the depth of the cut without slicing through the entire sheet. Hold the foam securely to prevent any movement. Steady hands and a sharp blade make all the difference when cutting tool foam.
Using a Hot Wire Cutter
A hot wire cutter offers another excellent method for cutting tool foam. The heated wire slices through the foam smoothly, leaving clean edges. This tool works well for intricate designs and curves. Ensure the wire maintains a consistent temperature for uniform cuts. Move slowly and steadily to avoid mistakes. A hot wire cutter provides precision and ease, making it a favorite among DIY enthusiasts.
Safety Precautions
Safety should always come first when working with cutting tool foam. Proper precautions protect you from accidents and injuries.
Protective Gear
Wear protective gear to keep yourself safe. Gloves protect your hands from sharp blades and hot wires. Safety goggles shield your eyes from foam particles. A dust mask prevents inhalation of small foam bits. Equipped with the right gear, you can focus on creating perfect tool inserts without worry.
Safe Cutting Practices
Adopt safe cutting practices to ensure a smooth process. Work in a well-lit area to see your cutting lines clearly. Keep your workspace tidy to avoid tripping over tools or materials. Take breaks if you feel fatigued. Tired hands can lead to mistakes. Follow these practices to maintain a safe and efficient cutting environment.
Cutting tool foam becomes a rewarding task with the right techniques and safety measures. These tips will help you achieve professional-looking results while keeping safety in mind. Enjoy the process and transform your toolbox into an organized masterpiece.
Refining and Finishing
Refining and finishing your tool inserts make a big difference in the final look and feel. You want those edges smooth and the inserts secured perfectly. Let’s dive into how you can achieve that.
Smoothing Edges
Smoothing the edges of your cutting tool foam gives a professional touch. You don’t want rough edges snagging your tools or hands.
Sanding Techniques
Grab a sanding block to start smoothing those edges. Lightly sand the edges of the foam. Move the sanding block in small, circular motions. This technique helps remove any jagged bits left from cutting. Keep the pressure even to avoid gouging the foam. You’ll notice the edges becoming smoother with each pass. Sanding works wonders on cutting tool foam, giving it a nice, clean finish.
Using a Heat Gun
A heat gun can also help smooth out the edges of your foam. Set the heat gun to a low setting. Gently wave it over the edges of the foam. The heat slightly melts the surface, smoothing out imperfections. Be careful not to hold the heat gun too close or too long in one spot. You don’t want to damage the foam. The hot foam smoothing tools work like magic, leaving you with sleek edges.
Securing the Inserts
Securing your inserts ensures they stay in place, even with frequent use. You don’t want your tools shifting around.
Adhesive Application
Choose the right adhesive for your cutting tool foam. Spray adhesive works well for most foam types. Apply a thin, even layer of adhesive to the back of the foam. Press the foam firmly into the toolbox or drawer. Hold it in place for a few seconds to ensure a strong bond. Double-sided tape can also work if you prefer a less permanent option. Make sure the foam adheres well to prevent any movement.
Final Adjustments
Once the foam is secured, make any final adjustments. Check that each tool fits snugly in its spot. Trim any excess foam if needed. A utility knife can help with precise cuts. Ensure the foam sits flush with the edges of the toolbox. These final tweaks make your cutting tool foam inserts look polished and professional.
Refining and finishing your cutting tool foam inserts elevate your toolbox organization. Smooth edges and secure inserts make a world of difference. Enjoy the satisfaction of a job well done and a toolbox that looks as good as it functions.
Common Questions and Troubleshooting
Every DIY project comes with its own set of challenges, and cutting tool foam is no exception. Let’s tackle some common issues and questions you might face.
Addressing Common Issues
Uneven Cuts
Uneven cuts can make your tool inserts look less professional. A sharp blade is essential for clean edges. Dull blades tear the foam, leading to rough edges. An electric knife can provide a super clean cut with minimal dust. One user shared, “You should try the electric knife. I used it quite a bit over the past couple of years to cut much denser foam than what you are going through.” Keep the foam steady while cutting to avoid jagged lines. If you find uneven cuts, consider using a sanding block to smooth out the edges.
Foam Durability
Foam durability ensures that your tool inserts last longer. Polyethylene foam offers excellent resistance to wear and tear. For softer foams like polyurethane, handle them with care to prevent damage. Some users find that foam with backing organizes tools nicely but struggle with cutting. One customer noted, “Foam with backing is a great product and nicely organizes tools. However, the ‘foam cutter’ doesn’t do a very good job of cutting the material.” Ensure you use the right tools for the foam type to maintain durability.
FAQs
Best Foam for Specific Tools
Choosing the right foam depends on the tools you plan to store. Polyethylene foam works well for heavy-duty tools due to its durability. EVA foam provides flexibility and is great for custom projects. For delicate tools, consider polyurethane foam for its impact absorption. Each foam type offers unique benefits, so match the foam to your tool’s needs for the best results.
Maintenance Tips
Maintaining your cutting tool foam keeps your toolbox organized and efficient. Regularly check for any signs of wear or damage. Replace worn-out foam to ensure continued protection for your tools. Clean the foam inserts with a damp cloth to remove dust and debris. Avoid using harsh chemicals that could degrade the foam. Proper maintenance extends the life of your tool inserts and keeps your workspace tidy.
Cutting tool foam can transform your toolbox into an organized haven. By addressing common issues and following these tips, you can achieve professional results. Enjoy the process and the satisfaction of a well-organized toolbox.
Additional Resources
Exploring additional resources can deepen your understanding of cutting tool foam and enhance your skills. Dive into these recommended readings and expert endorsements to expand your knowledge.
Recommended Reading
Books
Books offer a wealth of information on cutting tool foam. Consider reading “The Art of Foam Cutting” for a comprehensive guide. This book covers techniques, tools, and tips for achieving professional results. Another great read is “Foam Crafting for Beginners”, which provides step-by-step instructions for various projects. These books serve as valuable resources for both beginners and experienced DIY enthusiasts.
Online Articles
Online articles provide quick insights into cutting tool foam. Check out “Mastering Foam Cutting Techniques” for practical advice and innovative ideas. Another informative article is “Choosing the Right Foam for Your Tools”, which helps you select the best foam type for your needs. These articles offer valuable tips and tricks to enhance your foam cutting skills.
Expert Endorsements
Experts in the field have shared their experiences and insights on cutting tool foam. Learn from their successes and challenges through case studies and testimonials.
Case Studies
Case studies highlight real-world applications of cutting tool foam. One notable study, “Custom Foam Inserts for Oculus Quest VR Headsets“, showcases how personalized foam inserts protect and organize equipment during transit. Another study, “Benefits of Custom Box Inserts in Product Packaging“, emphasizes the luxury and quality that foam inserts bring to packaging. These case studies demonstrate the versatility and effectiveness of cutting tool foam in various scenarios.
Testimonials
Testimonials from professionals and hobbyists alike praise the benefits of cutting tool foam. A user shared, “Kaizen foam inserts transformed my toolbox organization. The 5S methodology now guides my workspace.” Another testimonial highlights, “Custom foam inserts in my Pelican case saved my fragile items during travel.” These endorsements underscore the value of cutting tool foam in enhancing organization and protection.
By exploring these additional resources, you can gain valuable insights and inspiration for your cutting tool foam projects. Whether you’re a beginner or a seasoned pro, these materials will enrich your understanding and help you achieve outstanding results.
Cutting tool foam transforms your toolbox into an organized haven. The process offers simplicity and satisfaction. Custom inserts protect tools and keep them ready for action. Imagine a firefighter using custom foam inserts to keep VR headsets untangled and ready for training. Crafting your own inserts preserves your passion and ensures gear readiness. Dive into the world of cutting tool foam. Explore additional resources to enhance your skills. Take the leap and create custom inserts today. Your toolbox will thank you.